| Jerusalem |
| Mount Zion |
| Conservation Measures at David’s Tomb |
| Orderer | The Jerusalem Development Authority |
| Implemented by: |
Amit Rosenblum
Aliza Van Zaiden
|
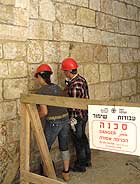
The conservation and development measures conducted at David’s Tomb were special because the project was carried out at a busy site fraught with religious overtones. According to data provided by the Ministry of Tourism hundreds, and sometimes thousands, of people visit the place daily. While implementing the conservation measures the heritage site in effect becomes a construction site, with all of the safety implications associated with one. Therefore in managing the project we had to contend with not only protecting and developing the heritage site, we were also responsible for the safety of both the visitors and the workers alike.
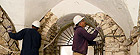
Of the numerous visitors that come to the site from different countries, many experience deep religious emotions there. In order to provide the visiting public an authentic experience, we who are engaged in conserving and developing the site have to be sensitive to their desires, even when the physical conditions are problematic and complex. That is to say, visitors must be permitted access to the holy places, to touch the tomb and visit the Cenacle, and furthermore, the rituals that take place at the site such as lighting candles, conducting mass and prayers in the Cenacle must also be allowed.
The recent conservation work at the site commenced in early 2010 and was completed this past May. The place was open to the public during this entire period. The work areas where the intervention was prolonged were closed off by means of fixed barriers consisting of sheet metal, wooden frames and nets. However, other work regions were opened and closed as necessary. Closing off areas in these regions was done utilizing mobile means such as wooden and iron barriers and signal colored cautionary tape. At the end of the workday the intervention area was opened to the public. It was only opened after we cleaned it and ascertained that no tools or materials such as mortar, stones etc. were left behind that might pose a hazard to the visitors’ safety there.
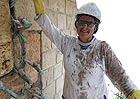
This article deals with the conservation work that was done between March 2011 and January 2013 in two main areas in the David’s Tomb compound. The first is the courtyard of the Franciscan cloister; the second is the southern facade of the tomb structure, which is also the northern wall of the cloister courtyard. In addition to these areas, conservation and development measures were implemented in almost all of the compound’s public areas. The conservation project also provided an opportunity to train others in the field of conservation. Students participating in the “Saving the Stones” program being taught at the City of Rome International Conservation Center in ʽAkko gained practical field experience there, as well as students enrolled in a Master of Arts degree in conservation at the University of Haifa.
The conservation measures were implemented by the Conservation Administration of the Israel Antiquities Authority. The conservation team included: a conservator (the author), five laborers and a supervising conservator – Aliza van Zeiden.
Conservation Measures
The conservation measures began with taking apart the modern building additions: cinder blocks, modern sawn masonry stones, cement castings and cement plaster. The dismantling was done slowly and methodically, using mechanical equipment and by hand. After the additions were removed we had a much better picture of the cloister compound and the tomb’s facade, and perhaps even more important, of their state of preservation.
1. Cleaning and Pointing the Joints
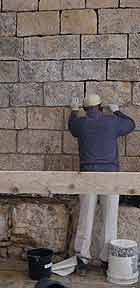
Dismantling the modern mortar was accomplished in the following manner whereby the treated surface was divided into vertical strips c. 1 meter wide. The intervention was implemented in each of the strips. After treating one strip the conservator skipped over the next two adjacent strips and continued working on the third strip.
After removing the mortar in each strip the joints were deeply re-pointed (up to 20 centimeters deep) with lime-based mortar and small stone wedges (klinim). Only after the re-pointing of the joints was completed and several days had elapsed was it possible for the conservator to work on the adjacent strip.
The deep re-pointing of the joints was done leaving about 2 centimeters in each joint in which a finish layer was applied. The color of this material matched that of the mortar characteristic of the construction period.
Upon completing the removal of the modern additions we had a better understanding of the construction phases. At that point it was possible to reach a planning decision that could express that understanding by means of modern intervention. This decision was implemented by creating different shades of lime-based mortar that matched the color of the original mortar and was applied in the final layer of the joints in the same manner as the original mortar. The depth to which the mortar was applied was also a factor that was taken into consideration. These means were used to indicate the construction phases or emphasize a particular part of the wall.
Three different shades of mortar were applied to the cloister enclosure: a yellow hue was used for the building elements that date to the Mamluk period and a light gray hue for the elements dating to the Ottoman period. These were mainly later blockages of the khan’s arches. Here the mortar was applied deeper in order to accentuate the voussoirs. A light brown shade was used to signify a later intervention. Its application was limited to only the eastern stoa in a place where a repair had been made, probably in the Ottoman period.
Three shades of mortar were applied to the southern façade of the tomb structure: a dark gray hue in the parts of the façade that date to the Byzantine period (the lower portion of the façade). These elements were built of massive ashlar stones. The mortar was applied relatively deeply such that it practically cannot be seen and as a result, the building parts, which are extremely important elements of the compound, were greatly highlighted. A very light gray hue, almost white, was used for the construction dating to the Crusader period (the main part and most of the surface of the façade). A light gray shade of mortar was used along the upper portion of the façade that was constructed in the Ottoman period as part of a repair to the roof of the Cenacle.
As previously mentioned, the use of various shades of mortar makes it possible to emphasize the construction phases of the different periods. The façade of the tomb structure and the Cenacle that were built in the Byzantine period were treated using dark mortar and the joints were filled to a point below the surface of the stone. In this way we rendered the façade the appearance of dry construction whereby one stone touches another stone without a mortar interface between them. In the parts of the façade that were built in the Crusader period we were asked to simulate the color of the original mortar that would give them a uniform and harmonious appearance. We used gray colored mortar for the Ottoman period building completions throughout the compound. This choice was meant to accentuate the rough construction that typifies these completions and the structural seams in the façade and the entire compound.
2. Stone Conservation
The conservation measures included implementing a number of techniques meant to strengthen the masonry stones and stabilize the walls:
Consolidation. This measure involves soaking the building stones with undiluted lime water by “painting” the surface of the stone numerous times. The lime-water penetrates the stones to a depth of c. 5 centimeters and the impregnated lime strengthens them.
This process of stabilizing masonry stones was applied to the façade of the tomb structure.
Completing the Stonework. Completing the masonry stones was done in instances when the stones were poorly preserved, weathered or part of the stone was cracked. The intervention included removing the broken part of the stone and completing it with a replacement stone that was secured in place utilizing fiberglass pins 6 mm in diameter. Lime-based mortar was applied to the replacement stone. The mortar was applied in several steps so as to ensure strength and stability. The finished color of the mortar was that of the original stone and its texture was matched to correspond to the stone dressing. The color was matched using minerals such as Arad sand and ceramic powder. This measure was mostly done to the cloister pillars.
Replacement of Masonry Stones. In places where the original masonry stones were very badly cracked, crumbling or in an advanced state of deterioration, that is to say they lost their structural capacity, we replaced the entire stone. In places where the original masonry stones were missing we completed the stonework with new stones.
Approximately fifty masonry stones were replaced in the cloister and more than forty were completed in the eastern wall of the stoa. The stones were prepared by a stone mason who worked with the conservation team. Each stone was dressed on site so that it would match the original, both from the standpoint of its dimensions and the nature of the stone dressing.
Retouching the Color. The tomb’s southern façade was renovated using cement several times in the past. This intervention left swatches of cement 5-10 centimeters wide smeared on the masonry stones. Removing this hazard also eradicated the stone’s patina to which the cement adhered. The result is visibly apparent as bright spots on the surface of the stone while the patina renders the surface a dark yellow hue.
In order to “blend in” the bright patches and provide a uniform appearance to the stones in the facade, the spots were retouched manually using mineral materials.
3. Cleaning and Documentation
Graffiti. While removing the cement plaster from the southern stoa of the cloister a number of ancient graffiti inscriptions were exposed on top of the original plaster. The sixteenth century CE is cited in two of the inscriptions.
Documenting the Stone Mason’s Marks. While removing the later interventions and afterwards, when re-pointing the joints on the tomb’s façade, some fourteen masonry stones were identified that bore stone mason’s marks which were documented. The conservation measures done to the façade were implemented slowly and methodically and great attention was paid to each and every detail. The conservator Aliza van Zeidin directed the documentation process whereby every stone that bore a mason’s mark was registered, described and photographed. As a result of this discovery we carefully re-examined the stones in the cloister; however, only four mason’s marks and two etchings on stone of a person’s head in profile were identified.
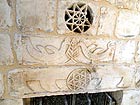
Stone-sculpted Decorations. Two windows from the Crusader period are in the southern façade of the tomb structure. Stone-sculpted heads were exposed on the window sills while removing modern cement from the façade. These heads were revealed facing each other at a 45° angle, without a nose, chin or eyes. The stone heads were probably defaced in a later period. The heads were conserved by means of delicate intervention that included a gentle and thorough cleaning in order to expose as much of the facial features that survived as possible. The stone conservation was done by means of consolidation.
The Cistern. A large cistern is situated in the middle of the cloister plaza. Its opening is located next to the southern façade of the tomb structure and is coated with cement. Before beginning conservation measures in the eastern stoa, the cistern was inspected in accordance with safety standards and in the presence of an official in charge of safety at the Israel Antiquities Authority. Using special equipment Shahar Puni, the IAA architect for the Old City, descended into the cistern and determined that the cistern’s physical condition was good and that it was not built beneath the stoa.
4. Engineering Measures
Filling Cavities in the Wall Cores. Filling in cavities in the wall cores was done by injecting them with lime-based mortar designed specifically for this purpose. This action was preceded by the drilling of holes 20 mm in diameter along a grid that allowed us to map the cavities. The injection was done manually by means of a hand pump and gravitation.
This step of filling cavities in the wall cores was carried out along the tomb façade and in the cloister, including the pillars.
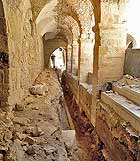
Stabilizing the Pillar Bases. The two center pillars in the cloister’s eastern stoa suffered from vertical cracks that ran almost the entire length of them. After consulting with Ing. Jacob Sheffer a trial excavation was conducted under the direction of Amit Re’em, the Jerusalem District Archaeologist. The excavation was meant to ascertain the depth of the cracking, assess the stability of the pillars, check the physical condition of the pillar bases and evaluate the extent of the structural damage. For the purpose of performing the excavation we supported the pillars and the wall above them using telescopic floor jacks. As a result of the findings from the trial excavation one of the most important constructive measures was carried out in the cloisters, which involved the engineering stabilization of the pillar bases in the eastern stoa. The stabilization was done utilizing rubble construction consisting of medium size fieldstones and lime-based mortar. The construction next to the very base of the pillar was c. 1 meter wide and tapered toward the top. After stabilizing the reinforced bases they were covered over with soil.
Stabilizing the pillar bases was also done in the southern stoa. The replacement of the drainage infrastructure, which was done by a development contractor, provided us an opportunity to evaluate the structural condition of the pillars in the southern stoa and stabilize them accordingly.
5. Plastering the Vaults
The treatment of the plaster on the vaults in the cloister included a number of components:
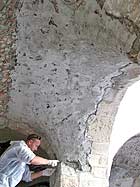
Removing Cement Plaster and Exposing the Original Plaster. When the conservation measures were first begun large parts of the vaults in the cloister were covered with cement plaster. The plaster had been affected by such weathering processes as disintegration, cracking and detachment from the vaults’ stones. The cement plaster was removed in alternating strips and the masonry stones were stabilized. When removing the cement plaster remains of original plaster were exposed, as well as several inscriptions of graffiti.
Stabilizing the Original Plaster. The remains of the original plaster that was exposed were stabilized by applying lime-based mortar to their edges. Thanks to the thickness of the plaster that was preserved next to the top of the vault ‘mini-grouting’ could be done which involved injecting lime-based mortar with a 50 mm syringe. Each point of injection utilized two pipes 1 centimeter in diameter. One pipe was used to inject the mortar and the other was meant for inspection and excess mortar was excreted through it. In that way we were able to avoid a build-up of excess pressure on the plaster which might have caused additional damage.
Applying New Plaster. Upon completing the stabilization of the cloister’s vaults, the masonry stones and the original plaster, we prepared to plaster the vaults. By carefully examining the existing plaster we identified how the original plaster was applied in the cloister. We applied the plaster, in accordance with our finds, in the same manner as the original plaster: the plaster in the southern stoa covers the main ribs while the new plaster in the eastern and western stoas abuts the main ribs which were left exposed.
The application of the new plaster to the cloister vaults was performed by a team of conservators of the Conservation Administration of the Israel Antiquities Authority under the direction of Avi Peretz. Lime based plaster was used and was applied in three layers: 1) a layer meant to straighten the surface; 2) a first coat; 3) a finish layer (a thin upper layer).
Due to a problem of salts in the cloister’s western stoa, and despite the fact that work was done to seal the courtyard above it, it was decided to apply Weber Evocall plaster which draws out the salts without damaging the integrity of the plaster.
In conclusion, David’s Tomb compound on Mount Zion is a most fascinating complex that poses numerous conservation challenges. The conservation and development work in the compound are very important to the continued proper use of it and to its safe functioning as a complex that attracts numerous and diverse visitors.
From the planning stage through implementation the conservation and development measures attempted to express the ethnic-cultural-religious diversity of the place and to emphasize the multiplicity of ethnic groups and different traditions associated with it which existed there throughout history and exist there today and which have left their mark on the site.
Amit Rosenblum
-------------------------
May 2013
-------------------------
To view the figures, click on the figure caption
|